Over my Christmas break, I decided to try a brand new project – sculpting a jointed doll from Paperclay.
Even though I don’t have much experience sculpting, I’ve always wanted to try this. I decided to make the doll for myself, unsure of how my first attempt at sculpting would turn out. I based my doll on the heroine of Cathrynne M. Valente’s Fairyland books, September, a brave girl from the 1930’s in a homespun cotton dress and the Green Wind’s fantastic coat. As I made my plans before sculpting, I took inspiration from antique French Bru dolls and the Paperclay art dolls of Holli, an artist I admire.


When I began sculpting, I immediately fell in love! I love the way Paperclay feels, and how easy it is to use. In the past, I’d had a hard time with clay and Sculpy, but Paperclay was soft and flexible, and much easier. I loved the feeling of literally forming something with my hands, something that would carry my fingerprints. I spent over a week sculpting and re-working every part of my doll, which, with Paperclay, which softens with water, was easy to do!
After September was dry, it was time for sanding and carving, the most tedious and labor-intensive part of the process. But then it’s time for the really fun part – painting.

Before getting started, I spent time with my watercolors mixing colors and testing them on a sheet of paper to make sure I got them right. I’d originally wanted to give September hazel eyes to match the brown hair I’d bought for her and the green coat she would wear, but as I played with colors, I decided to go with a purple -grey instead.
The painting stage was when September really came alive for me. Another doll artist I know has said that she doesn’t feel like her dolls are alive until she’s painted their eyes, and this is true for me as well.


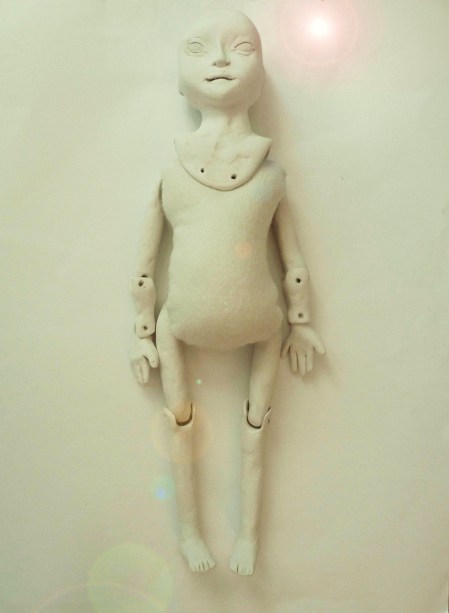
After September dries from being painted, I’ll be stringing her and creating her wig. I decided to give her a cloth body that her head and limbs will be sewn to. Before painting her, I quickly arranged her together and snapped a photograph to see what she’ll look like.

sunemoonsong
Could you explain your joints a little? I really like the look and feel of your doll. When you get further along please post more!
Jordan
Hi! Thanks! Her joints are really basic ball and socket joints. Her upper arms, wrists, and upper legs are rounded on the end, and her middle arm is hollowed out on both sides, and lower legs on the top side, to allow the joint to move. I poked holes through the joints and will thread them with elastic string and white buttons.I’ll have another post soon!
Ezra Gill
So this Dollmaking journey continues with my Passion for sculpting in paperclay…and embellishing with every kind of Media that I can get my hands on! I Teach Sculpting paper clay dolls and embellishing in Mixed Medias.
AJ
I have been wanting to try to create a doll for my grand daughter but haven’t found a lot of information on what to use to string dolls together and how to apply hair. Could you please help? Thanks
Jordan Taylor
Hi AJ –
I strung September with elastic string, and buttons outside of her joints. For her hair, I created a wig by sewing the hair to the toe of a (new!) sock, which I then stretched over her head and glued down. There are more sophisticated ways to make a wig cap, but this way was simple and effective! There are some good books on how to make ball jointed dolls, and a Google search should bring up tutorials for making a simple wig.
Pingback: Making My First Paperclay Art Doll, September – The Free Folk
Pingback: DIY Dollmaking Tutorial: Sculpt Your Own Paperclay Mini Doll – The Free Folk